Media Connected Home – Part 1
Posted on 15th April 2013
The way that we access media has been changing over the years. The ways of the DVD, and even the Blu-Ray, are starting to die as the preferred method of accessing media. With the invention of Netflix, CinemaNow, and even the older On Demand, the DVD and Blu-Ray have become less desirable. The DVR is now a home entertainment staple for keeping up to date with favorite shows.
What about accessing this media in different locations like on your smartphone or tablet? How about on another TV in your home? Some cable services offer whole home DVR which is a great way to watch your recorded media in different rooms instead of just one. What if your provider doesn’t offer it? How about if you are on the road? What if that episode is not available on Netflix or Hulu? What if a movie you want to watch while on the road is not synced to your smartphone or tablet? How about if it is not on Netflix or CinemaNow? Using a SlingBox to access your recorded programming but running out of space?
A Media Connected Home is the solution.
To solve this dilemma, if you consider this one, we will be using a number of software projects. Once everything is setup, we will be able to access recorded TV shows and converted movies anywhere in the home and while we are on the road.
Legal Notes
This article is for educational purposes only. I do not advocate the act of downloading pirated movies, music, or videos. The act of accessing legally owned videos and music can also be considered illegal in some circles. Make sure that you are aware of the rules and laws in your area on this subject.
I am not responsible for the destruction of any hardware, software, or personal injury as a result of following this guide. This is a Try at your Own Risk project and is intended for educational purposes only. I am also not responsible for the downloading of illegally obtained software and leave the responsibility of any End User License Agreements (EULAs) on to the person(s) reading this article.
All logos and names are the copyright of their respected owners and not that of the article author. Legal licenses are the responsibility of the user and not of the author of this article. The opinions of the author are not affiliated with any company or person(s) mentioned in this article or website.
Now on to the interesting stuff!…
Requirements: Hardware and Software
Hardware List
- A Dedicated PC to act as a media server. Mine is also connected to the main TV. Here are my specs:
- AMD Phenom II X4 965 3.4 Ghz Black Edition
- MSI NF750-G55
- 8 Gb DDR 3 PC3-10700 Ram
- XFX GT 120 NVidia PCI-E card with HDMI and sound output
- 3TB Western Digital Green SATA 3 Gbps
- 160GB Samsung OEM Sata 1.5 Gbps
- Hardware for additional devices accessing the media
- Apple TVs (For airplay support. Can also be jailbroken and XBMC can be installed)
- Raspberry Pi (Running XBMC)
- Smartphone and/or Tablet (Running XBMC, AirVideo, or Emit)
- HDHomeRunner (There is a Prime model that can almost replace your cable box)
- Desktop/Laptop running XBMC (Windows, Macintosh, or Linux based)
Software List
 XBMC (X-Box Media Center). This guide covers 12.0 Frodo
- Windows 7. There is also XBMCbuntu which will not be covered here
- RDP Concurrent Sessions Enabler. (Optional) Used to allow you to have 2 users logged in at the same time. Must create an account on this site to download the enabler
- MySQL Community Server found here
Software List for Part 2
- Airvideo or Emit for Android. I used both. Covered in Part 2
- iTunes. Needed for AirVideo
- Java. Needed for AirVideo
- Mobile Mouse or Unified Remote for Android. Used both. Covered in Part 2
- EventGhost. Covered in Part 2
- TheRenamer. Covered in Part 2
Setup: Hardware
The easiest part of setting up a media connected home, is the setup of the hardware. The obvious first step is to build the system that will be the media server. For this setup, I chose to use Windows 7 as there are a number of programs that will be used to help control or automate the media experience that are only available for Windows. 32 or 64-bit will be fine, but using 64-bit is recommended since you can run more then 4Gb of ram.
Install Windows as normal. I am using a small 160Gb drive for just the operating system and then a 3Tb drive contains all of the media data. This makes a re-install of the operating system later in the future a little bit easier.
You can install or setup any other devices that will be accessing the media, but you will not be able to connect them until after all of the software on the server is setup and configured.
Setup: The Operating System
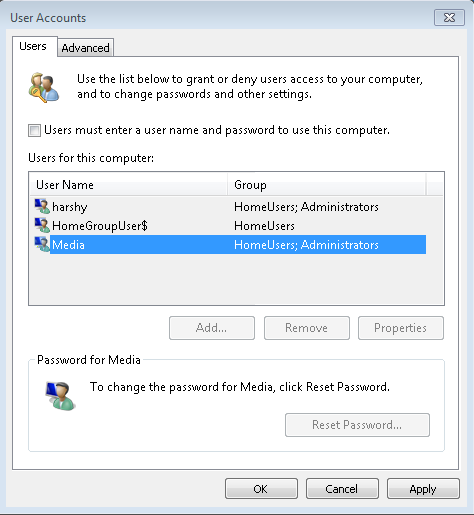
When I installed Windows. I created 2 user accounts, Media and a normal user account. The reason for the two accounts is simple. Media will be that account that will log in automatically on the TV side while the other user account is for RDP (Remote Desktop Protoc0l). The automatically logged in account will be running software that needs to run all the time. It is recommended to make sure that you have a password for both users for RDP security reasons. It is also here that I installed the RDP Concurrent Sessions Enabler as this would allow both users to be logged into the system at the same time. Follow that link to download and setup the concurrent sessions. You are required to register an account before downloading the installer. You will also want to make sure that you have installed SP1 otherwise this patch will not work.
Once you have created the user account(s) it is time to set one to login automatically. To do this, do the following:
- Hit you Windows Key + R to open the Run Dialog.
- Type control userpasswords2 and hit enter or click ok.
- When the User Accounts window opens up, you can uncheck the “Users must enter a user name and password to use this computer”.
- Click ok and it will ask you to enter the username of the user you want to use and then the password for that user.
- Restart the system and make sure that the user logs in properly.
I also set a static ip on this system so that adding firewall exceptions in my router will be easy as well as XBMC uses it to connect to MySQL.
Setup: Power Management
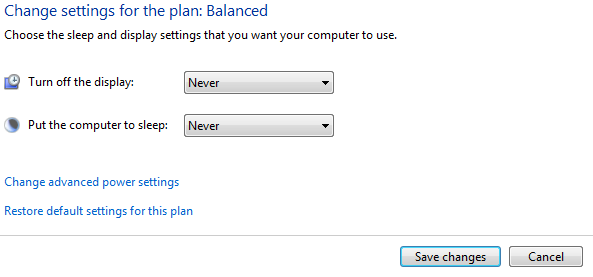 Since this system we are working on will be hosting the media and running other back-end software, we need to make sure that it always awake and ready. By default, windows will go into standby mode after 30 minutes. We will go in and turn this off.
Open your control panel and go to Power Options. Balanced is the defualt option. Click on “Change Plan Settings” which will open a new window. You may need to click “Change settings that are currently unavailable” in order to make changes. Change both “Turn off the display” and ” Put the computer to sleep” to “Never”. This will keep the computer from falling asleep. I did not worry about any advanced options.
Setup: Folder Structure
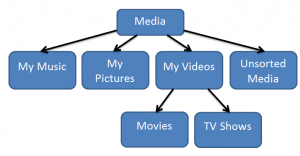
The media that you want to access needs to be stored somewhere that is accessible to the media server as well as any other devices. You will also need some sort of simple organization with this structure so that the media is separated into sources. Here is how I have setup the folders on a dedicated hard drive:
I like to direct the user folders, My Music, My Pictures, My Videos, and even Downloads to the shared media folder that way everything is consolidated to the media hard drive. It also makes it easy to access this media from either user account. To do this, while logged in under each user account, open Libraries. Open Music, Pictures, or Videos. At the top of the window you will see “Includes: 2 Locations”. Click on “2 Locations” which will open another window. Click “Add” and browse to the folder corresponding to the library you are currently in. Right click on the newly added location and select “Save as default save location . You can then remove the other 2 locations to keep everything nice an tidy. You can do a similar setup with the downloads folder by right clicking on it in the Start Menu and then selecting “Properties”. There is also a link to Downloads under favorites in the Explorer’s right pane. You will need to change that shortcut as well. I also added a Favorite for “Unsorted Media”.
As to the organization of the files/folders for Movies and TV Shows, we will cover this more in part 2 when we look into theRenamer. Basically, movies will be in their own folder and TV shows will be in a folder for the show name then the season and then episode.
Setup: Folder Sharing
We will want to make sure that our media is accessible over the network so that we can access it from other devices. In this setup, all that needs shared is the Media folder. Right-Click on the folder that you are sharing and select “Properties”. Select the “Sharing” tab and then click on “Advanced Sharing”. Select “Share this folder” and then click on “Permissions”. “Everyone” should already be added. You will want to click “Full Control” to give access to the folder to everyone.
Once that folder has been marked as shared, we will also need to change some advanced settings in the control panel. Open the “Control Panel” and then “Network and Sharing Center”. Click “Change advanced sharing settings” on the left. Scroll down to “Password protected sharing” and turn it off. This will make accessing the media in the shared folder easier.
Optional: You can share C:\Users\Media\AppData\Roaming\XBMC\userdata which is created once you install and run XBMC for the first time. By sharing this, you can sync other parts of XBMC like the sources.xml and rssfeeds.xml. I shared this so that i do not need to add each source to each device. More on this later. You will need to add Everyone to the Advanced Sharing and give them Full Control, and you may even need to add Everyone to the security tab and give them full control as well.
Setup: XBMC
Now that you have a working auto login user and the media is shared, it is time to install XBMC (X-Box Media Center). For this setup, we used 12.0 Frodo Final. Download the installer and install to your folder of choice. I used the default “Program Files(x86)” location.
You will want to launch XBMC under the account of the user that will be using XMBC on the TV. The first time that you run it, you may be presented the firewall exception screen for XBMC. You are ok to approve this for all but public networks.
Setup: SQL
Once XBMC is installed, we will want to setup a centralized database so that library updates and playback position can be synced across any other device using XBMC. We will be using Oracle’s MySQL Community Server which can be found here. I am using the 5.5 version which does have an installer for both 32 and 64-bit windows. When you run the installer, go ahead and select the “Complete” install after agreeing to the license terms. When the installer completes, we will need to all the installer to run the MySQL Instance Configuration Wizard.
In the wizard, we will select “Standard Configuration” and click next. Select “Install as a Windows Service” and “Launch the MySQL Server automatically” so that the server runs automatically and click next. “Modify Security Settings” should be the default option. Enter in a password for the root password and check “Enable Root access from remote machines”. Click next and then Execute.
The wizard will now complete the steps needed to get MySQL running on the machine. It will tell you that the configuration was created successfully and the Finish button can be clicked.
NOTE: If you have any issues in the later part of this guide with other XBMC devices connecting with the MySQL database, you may need to add inbound and outbound rules for port 3306 TCP and UDP on the host machine.
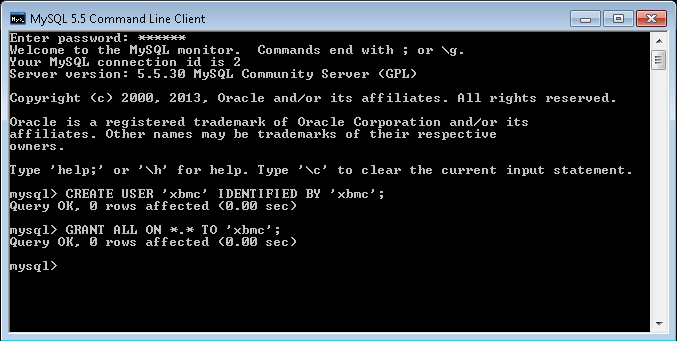
Now we will go to the start menu and find MySQL 5.5 and launch “MySQL 5.5 Command Line Client”. Enter in the password that you created during the wizard. If the password works, you will get a mysql> prompt. Enter the next two commands and make sure to include the ;
CREATE USER 'xbmc' IDENTIFIED BY 'xbmc';

GRANT ALL ON *.* TO 'xbmc';
If everything works ok, you will see this:
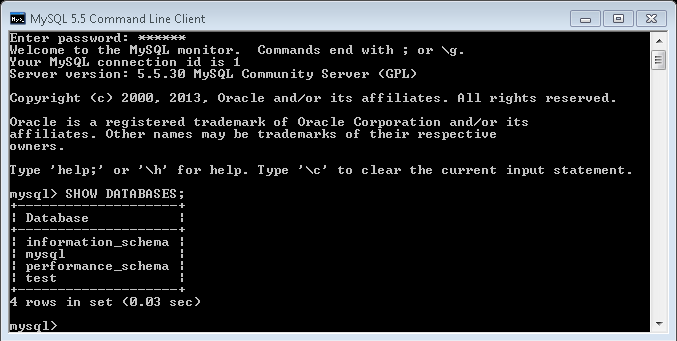
To give us an idea if XBMC is communicating with the MySQL database, we can pull a view of the database before we connect to it in XBMC. While in the MySQL Command Line Client, type in the following:
SHOW DATABASES;
You should then see this:
Now we can move on to getting XBMC connected to the new database.
Configuration: XBMC and MySQL
We will need to create a file called advancedsettings.xml which will help tell XBMC how to connect to the database. This file needs to be created for the user which will be running XBMC on the TV. For this setup, this would be the Media account. If you have not already, launch XBMC and then close it. This will allow it to make the basic configuration files. These can be found in:
C:\Users\Media\AppData\Roaming\XBMC\userdata
Where Media is the username of the account that is running the XBMC for the TV. Here, we will create the advancedsettings.xml. Open Notepad and insert the following:
<advancedsettings>

<videodatabase>

<type>mysql</type>

<host>192.168.1.2</host>

<port>3306</port>

<user>xbmc</user>

<pass>xbmc</pass>

</videodatabase>
<musicdatabase>

<type>mysql</type>

<host>192.168.1.2</host>

<port>3306</port>

<user>xbmc</user>

<pass>xbmc</pass>

</musicdatabase>
<videolibrary>

<importwatchedstate>true</importwatchedstate>

</videolibrary>

</advancedsettings>
Host should point to the static ip of the machine running MySQL. Save this as advancedsettings.xml and copy it to the userdata folder from above.
Optional: If you shared the userdata folder so that you can share the sources, rssfeeds, and other parts of XBMC to other devices, here is a full advancedsettings.xml with all of the shared userdata that XBMC recommends.
Configuration: Add the Sources
Now that XBMC has been connected to MySQL, it is time to add the media and scan it into the library. Fire up XBMC under the account it is going to run under. Goto Videos and then Files. Click Add Videos and then click Browse. Scroll down and click “Windows Network (SMB)”. A list of computers will show up. Select the one for the media server. Navigate through to the share and then add your Movies and TV Shows main folder. For Movies, I selected “Movies are in separate folders that match the movie title”. After you add each source, it will ask you to scan that source. You can go ahead and do it. Once you are satisfied with your sources, you can look to see if data is showing in the MySQL database. Open the “MySQL Command Line Client” and enter:
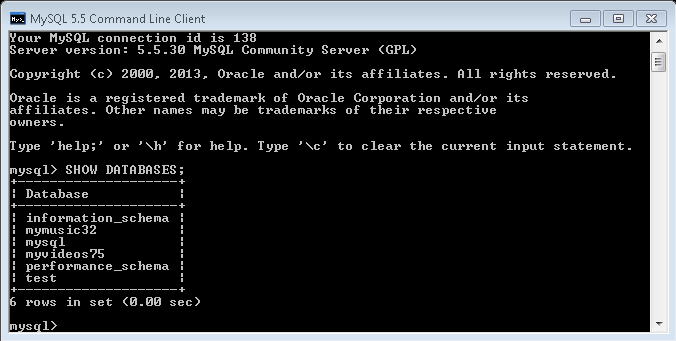
SHOW DATABASES;
You should see something like this:
The added mymusic32 and myvideos75 indicate that XBMC was able to connect and modify the database.
Setup: Additional XBMC Devices
Now that we have a working central database, we can connect other XBMC’s to this so that we can share the library and playback positions. We will want to navigate to the userdata folder where advancedsettings.xml is. We will copy advancedsettings.xml to one of the following directories depending on your device:
- Windows XP:
Documents and Settings\<your_user_name>\Application Data\XBMC\userdata\advancedsettings.xml - Vista/Windows 7:
Users\<your_user_name>\AppData\Roaming\XBMC\userdata\advancedsettings.xml - Mac OS X:
/Users/<your_user_name>/Library/Application Support/XBMC/userdata/advancedsettings.xml - iOS:
/private/var/mobile/Library/Preferences/XBMC/userdata/advancedsettings.xml - Linux:
$HOME/.xbmc/userdata/advancedsettings.xml
You can also copy the sources.xml, but if you used the optional additional configuration, then you only need the advancedsettings.xml to get everything synced.
Once you have copied over the advancedsettings.xml, you should be able to fire up XBMC on that device and you should see the same library as on the main install. If you
Wrap-Up: Part 1
In Part 1 of this series, we have created a central media computer and database that will be used in Part 2 to share the media to other devices in the home as well as on the road. In Part 2, we will connect other XBMC devices to this database server and will also use a few applications to share the media over the internet. We will then automatically rename, move, and update media into our library.
This guide was based off of the XBMC Wiki article found here.
Continue on to Media Connected Home – Part 2. (Coming Soon)
